Verifying Clusters
Verifying records in a cluster involves collecting expert feedback about the clusters Tamr Core generates, and then making changes to improve clustering.
When are Cluster Verification Options Useful?
You use different cluster verification options to provide feedback to the machine learning model about how records have been organized into clusters.
Verification options allow you to:
- Assess clustering records.
- Indicate that you reviewed the results of the clustering job.
- Manually edit clusters to account for exceptions you don't want the model to learn. For example, cluster verification options help in cases where two records that seem very different actually correspond to the same company because of an acquisition, and should be manually merged into the same cluster.
Cluster Verification Options
You use the following verification options when verifying records in the cluster.

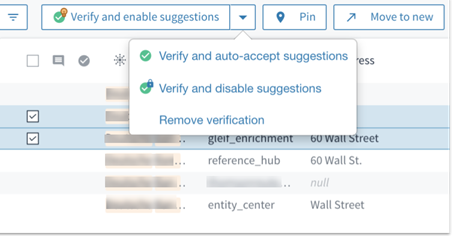
Cluster verification options: verify and disable suggestions (lock), verify and enable suggestions (lightbulb), or verify and auto-accept suggestions (move).
Verify and Enable Suggestions
Choosing this option allows you to verify one or more selected records as associated with the current cluster, and also enable the model to make further clustering suggestions. However, any new suggestions are not applied automatically. This is useful if you know that more records will arrive, or when you are working on creating clusters and this process needs to go through a few additional iterations.
Tip: The lightbulb turns from white ![]() to yellow
to yellow ![]() when Tamr Core has a suggestion for one of these verified records.
when Tamr Core has a suggestion for one of these verified records.
Verify and Auto-accept Suggestions
Choosing this option allows you to verify one or more selected records as associated with the current cluster, and also allows for the possibility of moving the records to another cluster based on future suggestions. This option is useful, for example, if you decide that you are now further along in the process of creating clusters, and that the model has been trained sufficiently so that you can trust the suggestions Tamr Core makes in the future.
This option indicates you agree with the model's suggestion, but Tamr Core can still move the records around if it disagrees with you in the next round of its cluster suggestions. You can only use this option to confirm that records are in the correct cluster, and not to merge or split clusters. Use it when you want to audit a cluster and indicate to your team that this record assignment is correct at a point in time, and to continue collecting more feedback on this cluster assignment.
Verify and Disable Suggestions
This option confirms that one or more selected records are associated with current cluster, and prevents the model from making further suggestions for these records. Choose this option if you are satisfied with the current verification and do not anticipate that records or datasets will change over time.
You can also use this option to override suggestions in edge cases, prevent generation of pairs for very large clusters, or in cases when you are sure that the clustering is correct and you don’t want to know if the model thinks otherwise.
Note: The Verify and disable suggestions option is available for backward-compatibility. Tamr does not recommend using it because of the following limitations:
- The model doesn’t make suggestions for records that use this configuration (also known as "locked cluster records"). As a result, you cannot compare suggestions made by Tamr Core with expert feedback.
- Records that use this configuration require expert intervention if the data or record relationship changes. For example, if a locked cluster contains a record and a company merger or split occurs, you must manually correct the cluster. In another example, if the data in a locked cluster for a specific record is updated with a new field, you must manually correct this locked record to reflect the new information.
Remove Verification
Choosing this option removes previously made cluster verifications and the record goes back to the pool of records for clustering. Choose this option if you do not agree with the current verification.
Verifying Records
To verify records in the cluster:
- Open the Clusters page.
- Select one or more records.
Note: You can select a cluster to show only records currently in that cluster, or use the cluster or record filtering options. - Choose Verify and enable suggestions, or use the dropdown menu to choose Verify and auto-accept suggestions, Verify and disable suggestions, or Remove verification.

Select the dropdown to view verification options for records in a cluster.
When you choose a verification option, the Clusters page refreshes as follows:
- Records in the table reflect verification states and allow you to take action.
- You can use verification filters that match existing cluster verification states. See Filtering Clusters.
- The cluster panel shows verification aggregations, such as the number of records in the cluster that may need to be moved to another cluster, or other actions stemming from the new verification states.

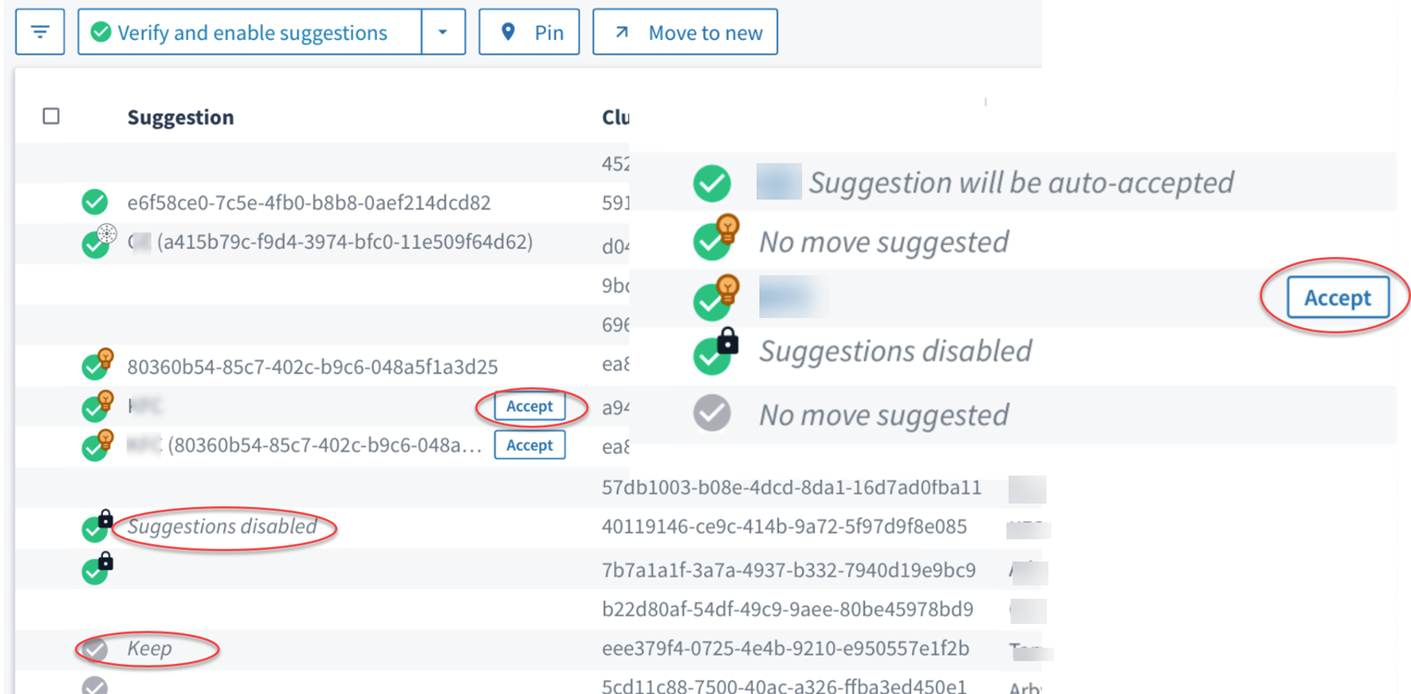
Accept suggestions or keep the current cluster assignment.
Note: Verify and enable suggestions has two different possible outcomes.
- The bulb is yellow
 when you and the model disagree about the record's cluster placement: the suggestion differs from the verified cluster. You may need to verify the suggestion again and decide whether you need to move the record to another cluster.

You and Tamr Core disagree.
- The bulb is white
 when you and the model agree about the record's cluster placement: the suggestion is the same as the verified cluster.

You and Tamr Core agree.
As a best practice, when you review a cluster, verify each and every record in their respective cluster. Do this by verifying records as belonging in their clusters, or moving records to new or existing clusters.
Pinning Cluster Records
You can pin records to the top to make comparisons easier, or before you move them to another cluster. This feature helps you keep track of a specific record or set of records while you work.
To pin records to the top of the records panel:
- Open the Clusters page.
- Select one or more records.
- Choose Pin.
Note: Pinned records are highlighted in green at the top of the page.
To unpin records:
- Select one or more pinned records.
- Choose Unpin.
Moving Records to a New Cluster
Moving records to a different cluster verifies the moved records in their new cluster.
To move records from a cluster to another cluster:
- Open the Clusters page.
- On the right side, select one or more records from the list and open record details.
- On the record details side panel, select Accept suggestion to add a record to a specific cluster Tamr Core suggests. Tamr Core offers the ID of this new suggested cluster.
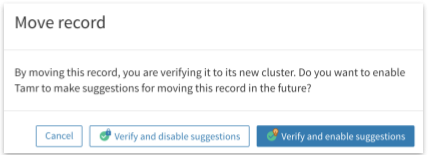
- In the Move record dialog, you can further decide if you want to move the record to the new cluster and verify and enable suggestions, or verify and disable further suggestions.

Moving a record to another cluster verifies that record in its new cluster.
Moving Records to an Existing Cluster
Moving records to an existing cluster verifies only the records being moved into their new cluster.
Moving Records with Drag and Drop
To move records from a cluster to an existing cluster using drag and drop:
- Open the Clusters page.
- On the right side, select one or more records.
- Drag
 the record(s) onto the new cluster.
Tip: In the Two-pane cluster browser ![]() , you can drag records across panes.
, you can drag records across panes.
Merging Clusters
Merging clusters is directional. When you merge clusters A and B you choose whether to move A into B, or B into A. These are different actions because when you merge A into B, all records become associated with the persistent ID for cluster B. Therefore, when merging clusters, you must decide which cluster's persistent ID you want your records to have before you merge them. This matters because Tamr Core's cluster suggestions are associated with a particular cluster persistent ID.
Note: There is a difference between moving records and merging clusters:
- If you merge cluster A into cluster B, Tamr verifies all records in the merged cluster B, including the records that were already there before merging.
- If you move all records of cluster A into cluster B, Tamr verifies all records from cluster A in their new cluster B, but it does not verify records that were already in the cluster B.
Merging Using Drag and Drop
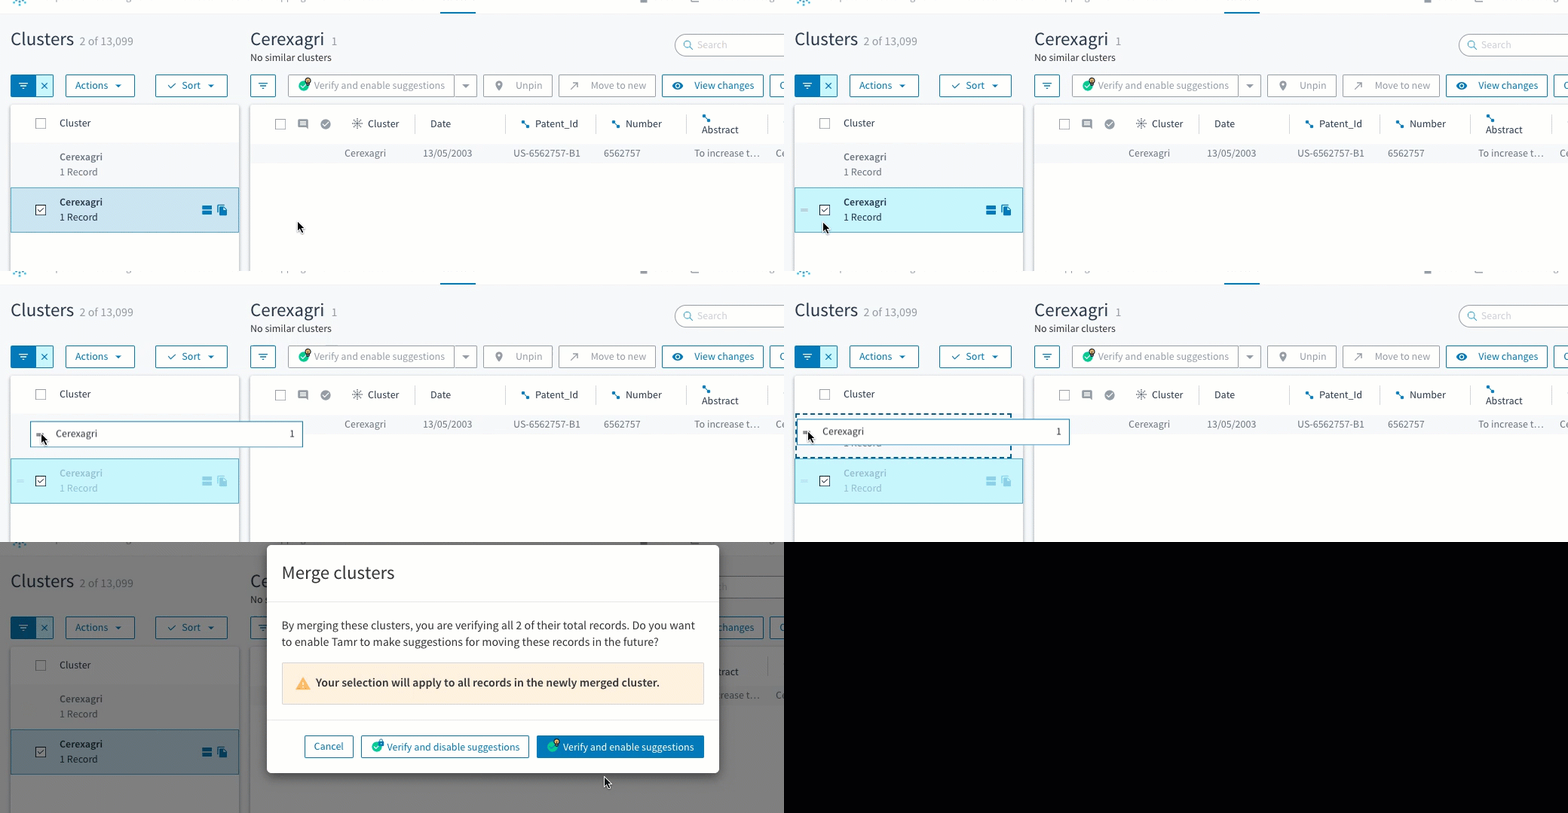
When you merge clusters using drag and drop, Tamr Core survives the cluster ID of the destination cluster which you drag onto. See Examples of Cluster ID Changes.
- Open the Clusters page.
- On the left side, select one or more clusters via Ctrl + Select or Shift + Select.
- To the left of the cluster name, Drag
 the clusters and drop them onto another cluster to be merged.
 - Choose a verification status.
- Decide if you want to Verify and disable suggestions or Verify and enable suggestions for further cluster assignments.

View how to merge clusters by dragging and dropping.
Merging Clusters Using Actions > Merge
When merging two or more clusters using Actions > Merge, Tamr Core survives the cluster ID of the cluster with the largest number of records. See Automatic and Manual Survivorship.
To merge clusters in the left side panel:
- Open the Clusters page.
- On the left side, select two or more clusters by using Ctrl+Select or Shift+Select.
- Select Actions > Merge.
- Decide if you want to Verify and disable suggestions or Verify and enable suggestions for further cluster assignments.
Navigation Using Two-Paned Cluster Browser
You can compare clusters by viewing two cluster panes at the same time. You can also drag and drop records and clusters across panes for easy editing. Note that sorting and column order are always synced across both panes.
To open a second pane for another cluster or record, select the Two-pane cluster browser ![]() next to its name. The two-pane browser is available in the cluster browser or the records browser.
next to its name. The two-pane browser is available in the cluster browser or the records browser.
Reviewing Cluster Information
To view details about a cluster:
- Open the Clusters page.
- Select a cluster from the left side panel.
- Select Open details to view the cluster information.
The cluster pane displays the cluster name, the number of records in it, and the number of verified records with suggestions disabled.
If clusters have been manually published by a curator, then in addition to the name, number of records, and number of locked records, the cluster pane also displays the following information:
- A graph of cluster size over time.
- The number of records added to and removed from the cluster since last publish, and the date of last publish.
- The cluster ID. This ID is permanent for the cluster and is guaranteed to never change.
See Publishing Clusters.
Updated about 1 year ago