Creating the Unified Dataset for Mastering
Working with the unified dataset of a mastering project.
The unified dataset of a mastering project represents the logical entity you wish to master, such as customers, products, contacts, or another entity that is important to your business. The unified attributes of the dataset are the attributes that best describe this entity across all input datasets.
The unified dataset accomplishes the following tasks for mastering:
- Defines a single schema across many dissimilar input datasets. This schema is used for processing. See Defining a Single Schema.
- Powers entity resolution by machine learning with attribute-specific configurations. See Configuring Machine Learning.
Creating a Unified Dataset
After you upload data, you can create your unified dataset.
To create a unified dataset:
- In a mastering project, select the Schema Mapping page.
- On the right side of the page, edit the supplied name for your unified dataset as needed.
- Select Create Unified Dataset.
Next Steps:
After you create the unified dataset, you can continue on to schema mapping. To commit changes to the unified dataset, at top right select Update Unified Dataset.
Important ![]() You run the Update Unified Dataset job to apply your changes and view the unified dataset.
You run the Update Unified Dataset job to apply your changes and view the unified dataset.
After you run Update Unified Dataset for the first time, you can:
- Enable the learned pairs feature for the project
- Add and adjust transformations
- Enable the record grouping feature for the project
- Add and adjust your blocking model iteratively
Defining a Single Schema
The unified dataset defines a single schema across all source datasets. The unified schema is the largest set of attributes common to all input datasets in the project. The task in schema mapping is to map each common source attribute to this single schema.
Profiling Datasets
Profiling is an optional step that you can run at any point in the workflow. Profiling attributes can help you understand the data at multiple points in the project. Profiling a dataset or individual attribute creates derived metadata about a given dataset. Useful metadata includes counts and histograms of distinct values, as well as inferred data types. For more information, see Profiling a Dataset
Configuring Machine Learning
Toggle Inclusion in Machine Learning
To the right of each unified attribute on the Schema Mapping page is a Machine learning ![]() icon that indicates whether the attribute should be used by the machine learning model to find similarities and differences between records. By default, machine learning is enabled for all unified attributes. If you select this icon to toggle machine learning off, attribute values appear for review, but are not used by the model to find similarities and differences.
icon that indicates whether the attribute should be used by the machine learning model to find similarities and differences between records. By default, machine learning is enabled for all unified attributes. If you select this icon to toggle machine learning off, attribute values appear for review, but are not used by the model to find similarities and differences.
For example, if your unified schema includes an attribute for an amount of money budgeted or spent, it is likely to be less useful to the machine learning model than attributes for a legal name, government-assigned ID number, or location information.
If you change the attributes included in machine learning, you must select Update the Unified Dataset to apply the changes.

The machine learning icons are shown surrounded by a red box. The blue icons indicate that the attribute is included in machine learning. The white icon indicates that it is not.
Choosing a Tokenizer or Similarity Function
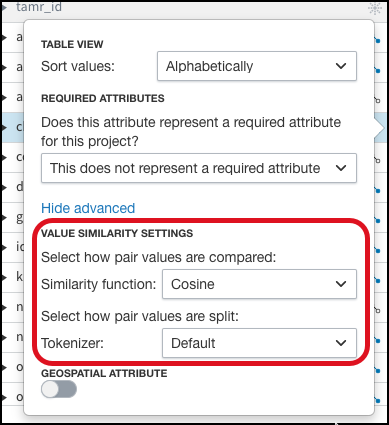
To compare values, Tamr Core uses tokenizers and similarity functions. You can change the supplied defaults.
Note: The tokenizer that you specify for an attribute on the Schema Mapping page affects system training after pairs are generated (that is, after experts identify matching and non-matching pairs). It does not affect how Tamr Core generates initial pairs. See Defining the Blocking Model.
To specify a tokenizer or similarity function for a unified attribute:
- Open the Schema Mapping page.
- Locate a unified attribute that is included in machine learning.
- Select More
 > Advanced.
 - Use the dropdown to change the Similarity function.
- Use the dropdown to change the Tokenizer.

Make updates to these settings after you select More > Advanced for a unified attribute.
Identifying Required Attributes
Configuring the Cluster Name Unified Attribute
This setting specifies which of the unified attributes identifies the entity type that you are mastering. An admin or author supplies an identifying name for the entity type at project creation such as Sites, Suppliers, or Customers.

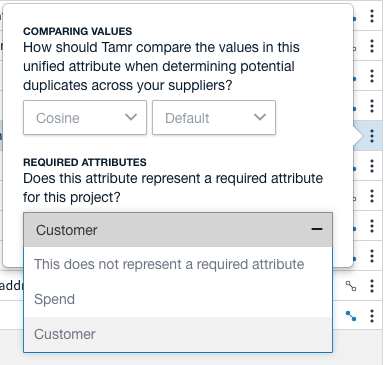
In a project that is mastering Customers, you specify the attribute that best represents each customer when records are clustered.
To configure a unified attribute as the cluster name attribute:
- Select More
 .
. - From the dropdown, choose the cluster identifier. For example, Customer.
Configuring the Spend Unified Attribute
The optional Spend setting allows you to specify a unified attribute of numeric data type to be aggregated per cluster. This makes it possible to navigate the clusters by Spend.
To configure a unified attribute as Spend:
- Select More
 .
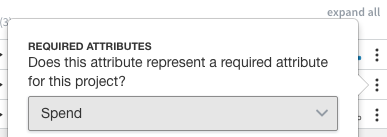
. - From the Required Attributes dropdown, choose Spend.

Configuring the Spend unified attribute.
Configuring User Preferences
Configure Sorting and Searching Preferences
- Select More
 .
. - From the Sort values dropdown, select Alphabetically or Numerically.
This selection does not change the data type. It only affects sorting and searching in the user interface.
Updated about 2 years ago