Using Policies to Control Access
You use policies to grant members specified levels of access to resources.
Tamr Core's authorization model is based on the relationships between resources and members with assigned roles. When you create a policy, you specify:
- Members: The users, groups, and projects that a policy grants privileges to.
- Resources: The specific datasets, projects, and policies that policy members can access.
- Roles: The level of access that each user and group you add has to policy resources. See Roles for Users and Groups.
For most use cases, you only need to add projects as resources to the policy, and not as members. See Default Project Auth Policy below. If you do add a project to a policy as a member, it is automatically given the project role.
Project administrators can audit user policies to see each user's policy membership and assigned role, and the datasets and projects they can access.
See the Permissions Matrix by User Role for a detailed reference into the features available to each role.
Default Project Auth Policy
By default, Tamr Core includes a single policy, Default Project Auth, that automatically includes all current and future projects as members, and all current and future datasets as resources. As a result, all projects in Tamr Core have “read” access to all datasets, and you do not need to add them to any other policies as members.
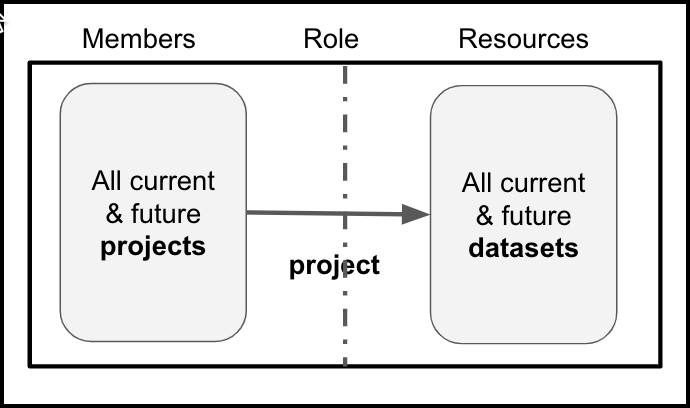
Default Project Auth Policy:
The project role gives project members read access to dataset resources
Note: For most use cases, the Default Project Auth policy should not be modified or removed. If you do choose to change or delete the default policy, you must manage projects as members of each policy you create in order to add datasets to projects. See Using Policies to Restrict Project Dataset Access.
Policy Members and Policy Resources
Policies give members access to resources; policies do not give resources access to other resources. Policies control member access to datasets and projects as follows:
- For a user or group to access a dataset, a policy must include both the user or group as a member and the dataset as a resource.
- For a user or group to access a project, a policy must include both the user or group as a member and the project as a resource.
- For a project to add a dataset, a policy must include the project as a member and the dataset as a resource. This requirement is typically met by the Default Project Auth policy.
Note: For most use cases, the Default Project Auth policy should not be modified or removed. If you do choose to change or delete the default policy, you must manage projects as members of each policy you create in order to add datasets to projects.
If you use the author role so that non-admin members can create projects, you must also add the policy to itself as a resource. This gives the authors the ability to add the projects they create to the policy.
Tip: You only need to add the policy as a resource if you assign the author role to any policy members.
User Policy Example
Consider a deployment that uses the Default Project Auth policy. You are an admin and are asked to set up access for new users Anne and Bob.
- Anne plans to deduplicate data in a project named Vendor Mastering, using datasets Vendor NA and Vendor EMEA (already uploaded).
- Bob is a subject matter expert who is advising Anne.
In this situation, you create a new mastering project, Vendor Mastering, and then set up a new policy for it. After reviewing the possible role assignments you can make, you:
- Add Anne with the curator role.
- Add Bob with the reviewer role.
- Add the Vendor Mastering project and the Vendor NA and Vendor EMEA datasets and make them resources of the policy.
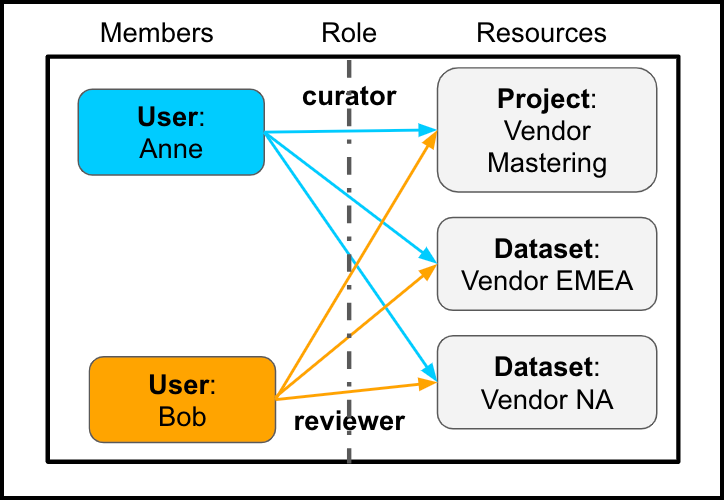
Example Policy (with Default Project Auth Policy)
The curator role gives Anne one set of access privileges to resources; the reviewer role gives Bob a more limited set
As a result:
- Anne can complete all project-related actions. She can add the two datasets as inputs to the project, because:
- As a curator, she has write (update) access to the project and both of the input datasets.
- The Default Project Auth policy automatically grants all current and future projects read access to all current and future datasets, so the project also has the required read access to both input datasets.
- Bob can provide feedback and complete other reviewer actions in the new project. Bob cannot add datasets because he is assigned a reviewer role, and this role does not have write (update) access to the project.
See the Permissions Matrix by User Role for details on the features that each user role can access.
User Policy Example with an Author
If, as an admin, you want to delegate the creation of projects to other team members, you can add them to the policy with the author role. Abigail is the team member who will have that responsibility.
In this case, when you set up the policy you:
- Add Abigail with the author role.
- Add Anne with the curator role.
- Add Bob with the reviewer role.
- Add the policy as a resource of itself.
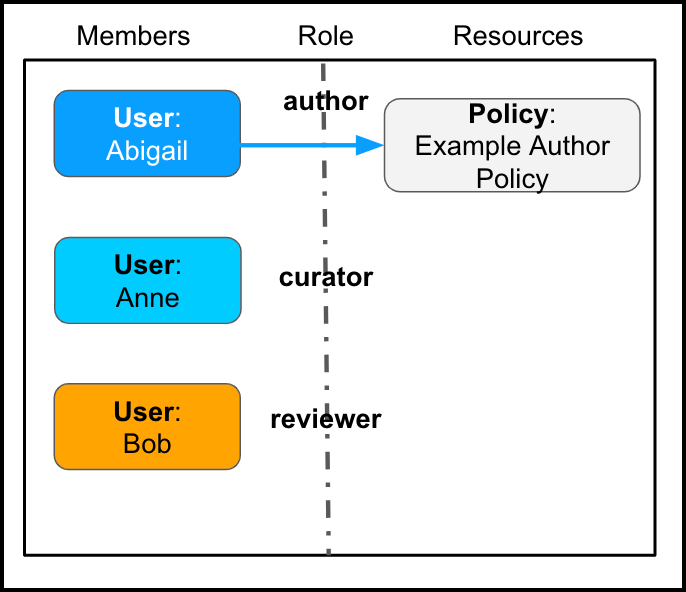
Example Policy with an Author (with Default Project Auth Policy):
By adding Abigail as a member with the author role, and adding the policy as a resource, Abigail will be able to add more resources to this policy.
As a result, Abigail can create the Vendor Mastering project and add it to this policy as a resource. Either Abigail or Anne can add the datasets. Each user can access each policy resource as permitted by their assigned roles.
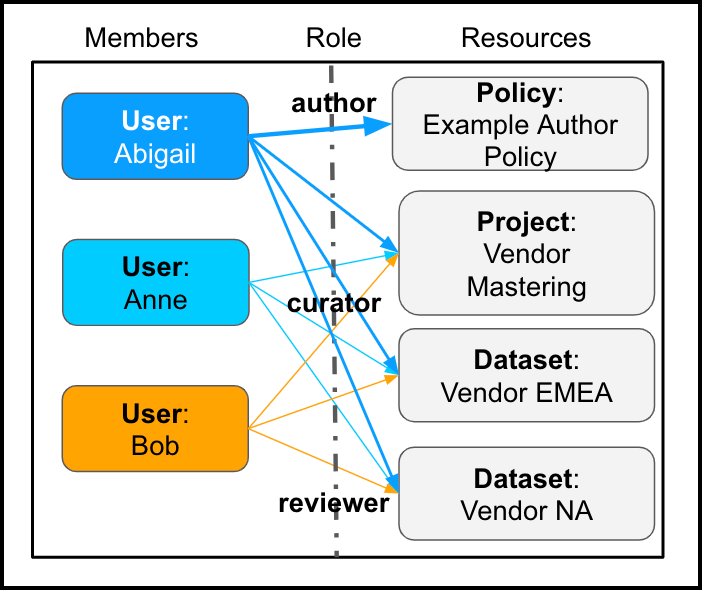
Abigail, Anne, and Bob can access policy resources as permitted by their roles.
See the Permissions Matrix by User Role for details on the features that each user role can access.
Using Policies to Restrict Project Dataset Access
You might decide that you need to exercise individual control over project dataset access. To implement this scenario, follow this workflow:
- Delete the Default Project Auth policy. Instead, you will manage projects as members of all of the policies required by your team and organization.
- Decide which projects will contain which datasets. For example, you have two projects and project A can include all of your input datasets but project B can include only some of the input datasets.
- To ensure that users who have access to sensitive data do not accidentally add restricted datasets to projects with users who should not have access to those datasets, create a policy that includes the project as a member and a resource, and add only the allowed (non-sensitive) datasets as resources.
Note: The Apply this policy to all current and future datasets option for datasets determines whether members with the curator role will be able to add datasets to projects. - Attach this policy to the restricted project B and test it. The policy should prevent users with access to both project A (through a different policy) and project B from accidentally adding restricted input datasets to the unrestricted project.
Returning to the example policy with Anne and Bob, but without the Default Project Auth Policy, you would also have to explicitly add the Vendor Mastering project as a policy member in order for the project to have read access to the datasets.
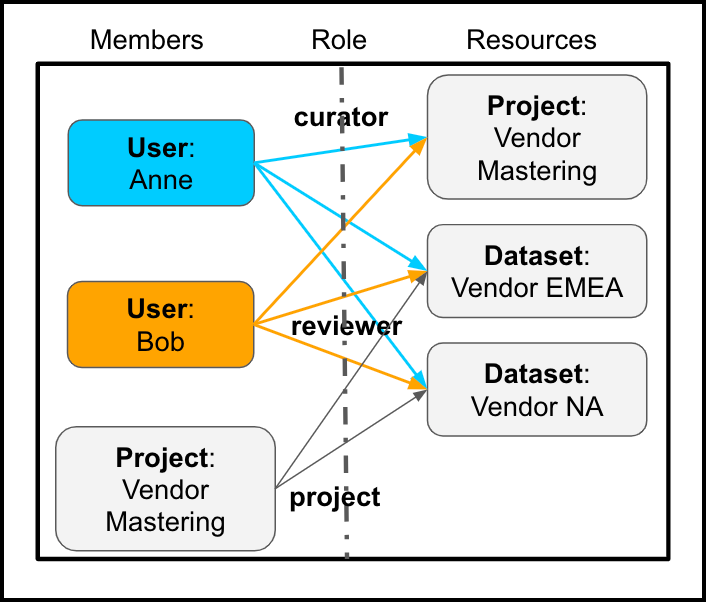
Example Policy (without Default Project Auth Policy)
Add the project as a member to give it read access to dataset resources.
Creating a Policy
Before you create policies, create users and groups.
As you add members and resources to a policy, Tamr Core presents options that can help streamline future work with that policy. As these options can have unintended consequences, review policy settings each time you add members or resources.
- When you add users or groups to a policy, you can choose a single role to apply to all current and future users or groups. If you select this option, you cannot make individual changes to roles.
- You can add projects as policy members individually, or choose the option to include all projects (including future projects) as policy members.
- When you add projects or datasets as resources, you can choose to apply the policy to all current and future projects or datasets.
To create a policy:
- Navigate to Policies > Create New Policy.
- In the Create new policy dialog, enter a Name and optional Description for the policy.
- Select Create Policy. The Manage members dialog opens.
- On the Users tab, add the appropriate users to the policy. You can select a role for each user, or a single role to apply to all users.
- On the Groups tab, add the appropriate groups to the policy, selecting the role for each group.
- (Optional) If your installation does not use the Default Project Auth policy, on the Projects tab add the appropriate project members to the policy.
- Select Save. The policy appears on the Policies page with the number of members in that policy.
- To add resources to the policy, select the projects, datasets, or policies link for the policy. The Manage resources dialog opens.
- On the Projects tab, select projects to add. You can also add or remove individual projects from policies by updating project access.
- On the Datasets tab, select Open Dataset Catalog to select datasets to add.
- On the Policies tab, select policies to add. If you assign the author role to any of the members of the policy, you must add the policy as a resource of itself.
- Select Save. The policy appears on the Policies page with counts of its members and resources.
Managing Policies
You can manage policies from the Policies page as needed. You can:
- Add or remove members or resources.
- Change the role assigned to a policy user or group member.
- Edit, duplicate, or delete an existing policy.
Updated over 2 years ago